

How to Use a Digital Viscometer? Viscosity measurement is one of those laboratory tasks that looks deceptively simple from the outside. You dip a spindle into a liquid, press a button, and a number appears on the screen. Done, right? Not quite.
Anyone who has spent real time working with viscometers knows that getting accurate, reproducible results requires understanding what the instrument is actually doing, why certain settings matter, and where the common pitfalls hide. If you’ve been wondering how to use viscometer equipment properly — not just how to get a reading, but how to get a correct reading — this guide walks you through every stage from initial setup to final documentation.
We’ll cover the digital viscometer specifically, since that’s what most modern laboratories are working with today. And if you’re in Pakistan looking for quality laboratory equipment, TOPTEC PVT. LTD manufactures locally and is worth knowing about before you go shopping.
What a Digital Viscometer Actually Measures
Before getting into the operational steps, it helps to understand what viscosity actually is and what the instrument is measuring when it generates that number.
Viscosity is basically a fluid’s resistance to flow. Think of it as internal friction between layers of fluid moving at different speeds. Thick honey has high viscosity. Water has low viscosity. Most pharmaceutical syrups, paints, cosmetic creams, and food products sit somewhere on a wide spectrum between those two extremes.
A rotational viscometer measures viscosity by spinning a spindle inside the fluid and measuring the torque required to maintain that rotation at a specified speed. The more the fluid resists that rotation, the higher the torque reading — and the higher the calculated viscosity. The instrument then converts that torque into viscosity units, typically centipoise (cP) or millipascal-seconds (mPa·s), which are numerically the same thing.
Understanding this mechanical principle is genuinely useful when learning how to use viscometer equipment, because it explains why spindle selection, rotation speed, sample geometry, and temperature all matter so much. They’re not arbitrary settings someone made up. They directly affect the mechanical interaction between the spindle and the fluid.
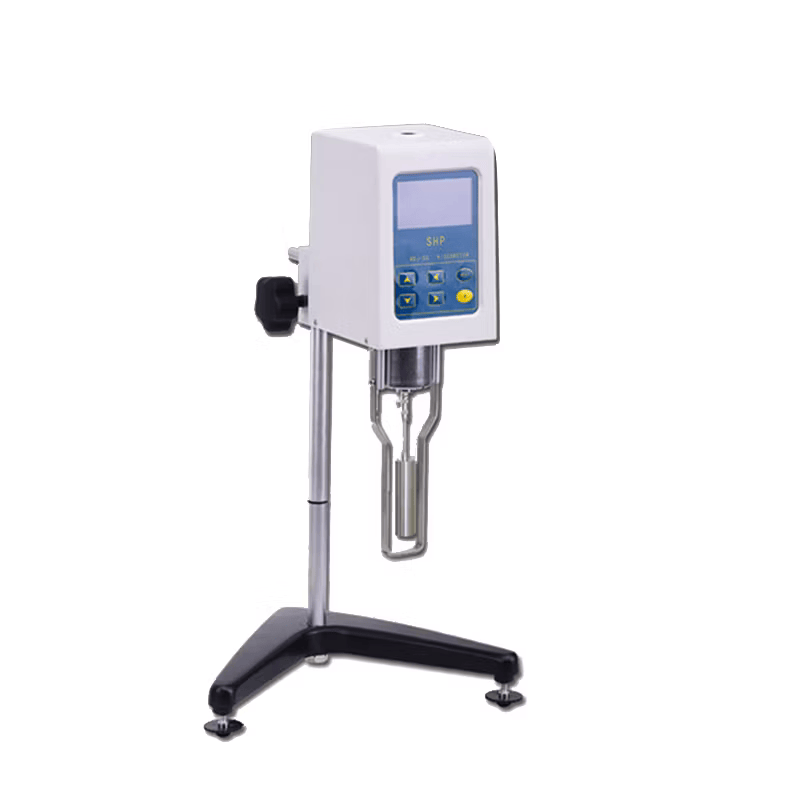
Getting Familiar With Your Digital Viscometer
Let’s orient ourselves with the instrument before touching any samples. Rushing past this step is one of the most common beginner mistakes.
The Drive Unit
The motor and control electronics sit in the main body of the instrument. In digital viscometers, this unit handles motor speed control, torque sensing, display output, and data logging. The quality of the drive unit determines how accurately speed is maintained and how sensitively torque changes are detected.
The Spindle Set
Most digital viscometers come with a set of spindles numbered from 1 to 4, or 1 to 7, depending on the model. Lower-numbered spindles are larger and are used for low-viscosity fluids. Higher-numbered spindles are smaller and are appropriate for high-viscosity materials. The relationship between spindle size and fluid viscosity is central to understanding how to use viscometer equipment correctly — and we’ll come back to this in detail.
The Guard Leg
This is the cylindrical guard that surrounds the spindle shaft and sits against the sample container bottom. It protects the coupling mechanism from damage if the spindle accidentally contacts the container. Some measurements require the guard leg; others don’t. Your method documentation should specify this clearly.
The Display and Controls
Digital viscometers have LCD or touchscreen displays showing viscosity, torque percentage, rotation speed, and temperature on models with temperature probes. Controls let you set speed, select spindle number, start and stop measurements, and access data logging features.
The Temperature Probe
Some digital viscometer models include integrated temperature measurement. Others require a separate probe. Since viscosity is highly temperature-dependent, knowing the actual sample temperature during measurement isn’t optional — it’s essential.
Step 1: Understand Your Sample Before Anything Else
Before you even turn on the instrument, spend time understanding what you’re measuring. This is one of the most overlooked steps when learning how to use viscometer equipment, but it determines almost every other decision you’ll make.
Ask yourself a few practical questions:
Is the sample Newtonian or non-Newtonian? Newtonian fluids have viscosity that stays constant regardless of how fast you’re stirring or shearing them. Water, simple syrups, and mineral oils behave this way. Non-Newtonian fluids — paints, gels, polymer solutions, pharmaceutical suspensions — change viscosity depending on the shear rate applied to them.
If your sample is non-Newtonian, the speed you choose during measurement matters enormously. Measuring at 10 RPM will give a completely different viscosity than measuring the same material at 100 RPM. Neither reading is wrong, but they’re not interchangeable, and your method needs to specify which speed to use.
What’s the expected viscosity range? Even a rough estimate helps you select an appropriate spindle before the first test run. This avoids wasting sample on trial-and-error attempts.
What temperature will the sample be at? Some samples are measured at room temperature. Pharmaceutical products are often measured at 25°C or 37°C. Know your target temperature before you start heating or cooling anything.
Step 2: Preparing the Sample Properly
Sample preparation is honestly where many viscosity measurement errors actually originate — well before the spindle ever enters the fluid.
Container Selection
The container geometry affects measurement results, especially for low to medium viscosity fluids. Most rotational viscometer methods specify using a standard container size — commonly a 600 mL low-form Griffin beaker. Using different container sizes introduces what’s called wall effects, where the container wall interferes with fluid flow patterns around the spindle and gives artificially high readings.
If your method specifies a container size, use exactly that. If you’re developing a new method, document the container size and stick to it consistently across all measurements.
Sample Volume
You need enough sample to fully submerge the spindle to the immersion mark without the spindle touching the container bottom or walls. Most standard measurements require 250 to 600 mL depending on the spindle. Insufficient volume causes the spindle to pull air into the fluid, which completely disrupts the measurement.
Mixing Without Creating Bubbles
Viscous samples often separate or develop concentration gradients if left standing. Before measuring, gently mix the sample to achieve uniform composition. But don’t introduce air bubbles — vigorous shaking creates foam that interferes with measurement. Use a gentle stirring rod rather than a mechanical mixer when possible.
Temperature Equilibration
This step deserves more respect than most labs give it. A sample that’s even a few degrees away from the target temperature will give inaccurate viscosity readings. Viscosity changes significantly with temperature — often 5 to 10% per degree Celsius for many fluids. Allow 15 to 30 minutes for the sample to reach and stabilize at the target temperature before measuring. Use a water bath or temperature-controlled jacket around the sample container to maintain temperature during the measurement, not just before it.
Step 3: Selecting the Right Spindle
Spindle selection is probably the most consequential decision in the measurement setup. Get this right, and everything downstream is easier.
The goal is to choose a spindle and speed combination that gives a torque reading between 10% and 100% of full scale — ideally somewhere between 50% and 90% for best accuracy. Most viscometer manufacturers provide a selection chart that maps expected viscosity ranges to spindle-speed combinations.
Here’s a rough guide:
Low-viscosity fluids (1 to 100 cP) — Use larger spindles at higher speeds. The larger surface area generates more measurable torque even in thin fluids.
Medium-viscosity fluids (100 to 10,000 cP) — Middle-range spindles at moderate speeds typically work well.
High-viscosity fluids (10,000 cP and above) — Smaller spindles at lower speeds. Large spindles in thick materials generate excessive torque and may strain the motor.
If your torque reading falls below 10%, switch to a larger spindle or higher speed. If it exceeds 100%, switch to a smaller spindle or lower speed. When you’re first learning how to use viscometer equipment on a new sample type, start conservative and adjust. Don’t force a reading because the spindle is already in the sample — remove it, reselect, and remeasure properly.
Step 4: Attaching the Spindle Without Damaging the Instrument
This sounds trivially simple but causes surprisingly common measurement errors. It’s also a surprisingly easy way to damage an expensive instrument if you’re not careful.
Digital viscometers typically use a left-hand thread spindle coupling. This means you turn the spindle clockwise to loosen and counterclockwise to tighten — the opposite of standard hardware threads. The reason for this design is that the spindle rotates clockwise during measurement, so the reverse thread prevents it from unscrewing itself while running.
Here’s the correct attachment technique:
First, raise the viscometer or lower the platform so the coupling is accessible. Hold the coupling steady with your left hand — you’re protecting the pivot point from lateral force. With your right hand, hold the spindle body (not the shaft) and engage the thread. Turn counterclockwise until finger-tight. Gently lift the spindle upward while tightening to seat it correctly against the pivot.
Never apply sideways force to the spindle shaft. The instrument’s pivot mechanism is sensitive, and lateral force during attachment can damage or misalign it. I’ve seen people knock spindles sideways and wonder for weeks why their readings were inconsistent. It was the pivot the entire time.
Step 5: Configuring the Instrument Settings
With your sample prepared and spindle attached, configure the instrument before starting measurement. This is a step where understanding how to use viscometer controls properly saves you from wasted samples and repeat runs.
Entering the Spindle Number
Enter the spindle number you’ve selected into the instrument’s control menu. The viscometer uses this number — along with the speed setting — to calculate absolute viscosity from the raw torque reading. Entering the wrong spindle number means the instrument applies incorrect conversion factors and gives you completely wrong viscosity values that look perfectly plausible on the display.
This mistake happens more often than you’d think. In busy labs where multiple spindles are used throughout the day, people change spindles and forget to update the spindle number in the system. The reading looks reasonable, gets recorded, and the error isn’t discovered until a comparison fails later.
Setting the Rotation Speed
Speed is expressed in RPM on most rotational viscometers. For Newtonian fluids, the specific speed matters less as long as torque stays in range. For non-Newtonian fluids, use exactly the speed specified in your method — no approximations.
Configuring Data Logging
Many digital viscometers allow you to set measurement duration, sample interval, number of readings to average, and data export settings. For QC measurements, configure the instrument to take multiple readings over a defined period and report the average. This smooths out minor torque fluctuations that are normal during operation.
Step 6: Immersing the Spindle Into the Sample
How you lower the spindle into the sample affects the quality of your readings from the first moment.
Position the sample container directly below the spindle. Slowly lower the viscometer until the spindle shaft reaches the immersion mark — a groove or indicator line on the shaft that indicates the correct depth. This mark ensures the spindle is submerged to the depth assumed in the calculation factors built into the instrument.
Keep the spindle centered in the container. The spindle should not be closer to any container wall than its own radius. Off-center positioning introduces wall effects that distort readings.
Once immersed, don’t move the container or disturb the fluid. Even someone bumping the bench affects torque readings.
Then wait. Allow 1 to 2 minutes after immersion before starting the motor. The act of lowering the spindle locally disturbs the fluid, and it needs to settle back to equilibrium before you start the measurement.
Step 7: Running the Measurement
Press start and watch what happens. The torque display will typically show some initial fluctuation as the fluid around the spindle establishes steady flow patterns. This settling time varies — from 30 seconds for thin fluids to several minutes for thick creams or gels.
What you’re looking for is torque stabilizing to a relatively steady value. Minor fluctuations of ±1 to 2% are normal. If torque is continuously climbing rather than stabilizing, the sample may be thixotropic — its structure is breaking down under shear. If it’s continuously falling, the sample may still be temperature-equilibrating.
For routine QC measurements, allow the reading to stabilize and record the displayed viscosity. For research or characterization work, record readings over a longer period and note the time-viscosity relationship.
One more thing — don’t reach into the sample container or touch the instrument while the spindle is rotating. Touching the instrument body introduces vibration that affects readings, and the rotating spindle creates obvious physical hazards near the container rim.
Step 8: Reading and Recording Results Correctly
Your display shows several values simultaneously, and understanding all of them is part of knowing how to use viscometer data correctly.
Viscosity (cP or mPa·s): The primary reported result.
Torque (%): Confirms your spindle-speed combination was appropriate. Record this alongside viscosity.
Speed (RPM): Confirm the actual speed matches your setpoint.
Temperature: Record actual sample temperature at the time of measurement.
Here’s something important that gets skipped constantly: never record just a viscosity number. A viscosity reading without spindle, speed, and temperature information is essentially meaningless for any comparison or compliance purpose. If you can’t reproduce the measurement conditions, you can’t reproduce the result — and nobody reviewing your data will be able to either.
A complete record should include: sample identification, date and time, spindle number, speed in RPM, torque percentage, temperature in °C, viscosity result, number of readings averaged, and analyst initials.
Step 9: Removing and Cleaning the Spindle
Stop the motor completely before attempting spindle removal. Hold the coupling body steady and turn the spindle clockwise to loosen (remember — reverse thread). Lift straight upward without any lateral force.
Clean the spindle immediately after removal. Many samples dry, crystallize, or polymerize if left sitting on the spindle, making removal later difficult without physical force that can deform the spindle geometry.
For water-soluble samples: rinse with purified water, final rinse with isopropanol, dry with a clean lint-free cloth.
For oil-based or organic samples: use an appropriate solvent first, then rinse with isopropanol and dry thoroughly.
And this is critical — never immerse the main body of the viscometer in cleaning solution. Only the spindle and coupling area below the guard leg are designed for liquid contact. Getting liquid into the drive unit is catastrophic for the electronics.
Step 10: Verification and Calibration
Knowing how to use viscometer equipment properly includes knowing how to confirm it’s working correctly.
Daily Verification
Run a viscosity reference standard at the start of each working day before testing actual samples. These are certified reference materials — typically silicone oils — with a stated viscosity value and uncertainty at a specific temperature.
Measure the reference standard exactly as you would a sample. The result should fall within the stated uncertainty of the reference value (typically ±1% for a well-calibrated instrument). If it doesn’t, investigate before running any samples that day.
Formal Calibration
Viscometers require formal calibration against traceable reference standards on a defined schedule — typically annually, or following any mechanical incident like dropping a spindle or rough handling of the drive unit.
Spindle Inspection
Inspect spindles before each use. Bent, scratched, or corroded spindles give inaccurate results because the spindle geometry is part of the calculation factor used to convert torque to viscosity. Any deformation changes that geometry. Replace damaged spindles — don’t keep using them and wondering why results are drifting.
Temperature Control — Seriously, Don’t Underestimate This
Let me revisit temperature specifically because it’s genuinely the most common source of viscosity measurement error in actual laboratory practice, and understanding how to use viscometer temperature controls properly is that important.
Viscosity changes exponentially with temperature for most fluids. A 1°C error in temperature can cause a 3 to 10% error in viscosity depending on the fluid. That level of error can shift a sample from within specification to out of specification without anything actually being wrong with the product.
Use a circulating water bath with a jacket or immersion coil around the sample container to maintain constant temperature during measurement. Monitor temperature continuously with a calibrated thermometer — not just the instrument’s onboard probe, which may not be positioned at the same height as the spindle.
For cold temperature measurements, precool the sample container before introducing the sample. A room-temperature beaker will rapidly warm a chilled sample regardless of how carefully you’ve temperature-equilibrated the liquid itself.
Document the exact temperature at which each measurement was taken. Don’t assume room temperature is constant — it varies during the day and between seasons in ways that matter more than most people realize.
Non-Newtonian Fluids — A Few Extra Considerations
Since pharmaceutical syrups, creams, and many other common samples are non-Newtonian, knowing how to use viscometer equipment for these materials requires a bit more thought.
Thixotropic materials — viscosity decreases with time under shear. These show high initial torque that gradually drops. Allow adequate time for stabilization, or document the time-viscosity profile as part of characterization. Repeating the measurement immediately after the first run may give different results because the material hasn’t structurally recovered yet.
Shear-thinning materials — viscosity decreases as rotation speed increases. Measure at the exact speed your method specifies. Changing speed changes viscosity for these materials. Period.
Yield stress materials — won’t flow until a minimum force is applied. Standard spindles may not characterize these accurately. Some viscometer models offer vane spindles designed specifically for yield stress measurement. If your material is a thick gel or paste, discuss spindle options with your equipment supplier before assuming standard spindles will work.
Common Errors and Honest Solutions
Here’s a practical rundown of where things actually go wrong when people are learning how to use viscometer equipment day-to-day:
Torque reading outside 10-100% range: Select a more appropriate spindle-speed combination before recording any results. Don’t average bad readings and call it good.
Reading won’t stabilize: Check that sample temperature is stable, check for air bubbles, check that the spindle is properly centered in the container.
Results vary significantly between repeats: Ensure sample is homogeneous, spindle is fully immersed to the mark, temperature is controlled, and the bench isn’t vibrating from nearby equipment.
Readings much higher or lower than expected: First thing to check — does the spindle number entered in the instrument match the spindle actually in the sample? This error is embarrassingly common.
Spindle difficult to remove after measurement: Clean the spindle immediately after every single use. This is a discipline issue, not a technical one.
TOPTEC PVT. LTD — Practical Support for Pakistani Laboratories
When you’re setting up or upgrading a laboratory in Pakistan, sourcing quality instruments locally matters for reasons that go beyond convenience. TOPTEC PVT. LTD manufactures laboratory furniture and equipment domestically, which removes the import friction — customs delays, currency fluctuations, incompatible voltage standards, and support tickets that take weeks to resolve — that slows so many laboratory projects down.
Understanding how to use viscometer equipment properly starts with having reliable, properly built instruments. Local manufacturing through TOPTEC means equipment built for Pakistani laboratory conditions — local power supply standards, local ambient temperature ranges, and regulatory documentation that Pakistani auditors actually recognize. When something needs attention, support is accessible without international time zone barriers.
TOPTEC’s product range extends well beyond individual instruments. They manufacture laboratory workbenches, fume hoods, biological safety cabinets, laminar flow hoods, pass boxes, and a comprehensive range of laboratory furniture for pharmaceutical, research, and teaching laboratories. For facilities equipping complete laboratory environments, working with a single local manufacturer simplifies everything from ordering to documentation to long-term support.
Building Your Own Method SOP
For laboratories developing internal methods rather than following published pharmacopoeial procedures, here’s a structured approach that builds on everything covered about how to use viscometer equipment:
Step 1: Characterize your sample by running measurements at three to five different speeds. If viscosity changes significantly with speed, the sample is non-Newtonian.
Step 2: Select the speed that gives 50 to 70% torque for your expected viscosity range. This becomes your method speed.
Step 3: Run 10 replicate measurements on the same sample under controlled conditions to determine repeatability. Aim for less than 2% RSD for routine QC methods.
Step 4: Test temperature sensitivity by measuring at three temperatures around your target. This tells you how tightly temperature must be controlled in your method.
Step 5: Write it all down as a formal SOP specifying spindle number, speed, temperature, container type and size, sample volume, equilibration time, number of readings, and acceptance criteria.
Step 6: Validate — demonstrate accuracy against a reference standard and repeatability from your replicate study. Don’t skip this step for regulated applications.
Closing Thoughts
Knowing how to use viscometer equipment well is a skill that genuinely develops with practice and attention to detail. The mechanical principle is simple enough. But consistent, accurate measurement requires understanding sample behavior, controlling temperature carefully, selecting appropriate spindle-speed combinations, and maintaining documentation habits that hold up under scrutiny.
Whether you’re characterizing a new pharmaceutical formulation, running routine QC checks on syrup batches, or investigating viscosity changes in a cosmetic product — the steps in this guide give you the foundation to do it right. Understanding how to use viscometer systems at this level of detail will improve the reliability of your results and reduce the time you spend troubleshooting readings that just don’t look right.
For laboratories in Pakistan, TOPTEC PVT. LTD offers locally manufactured laboratory equipment and furniture that supports everything from basic testing setups to fully equipped pharmaceutical QC laboratories. Accessible technical support, appropriate documentation, and local manufacturing make them worth talking to early in your planning process.
Take your time understanding your samples. Configure the instrument carefully. Control your temperatures. Document everything. That combination — good technique, reliable equipment, complete records — is what turns viscosity measurement from a frustrating variable into a genuine quality tool.